**Posts contain affiliate links and I will be compensated at no extra cost to you if you make a purchase after clicking on my links.

Friday, October 25, 2013

Blogger's Quilt Festival - Peace and Harmony

Welcome to my post for Amy's Creative Side's Blogger's Quilt Festival!


AmysCreativeSide
  
I apologize to my faithful readers for the repeat of this quilt, but I really felt like sharing it in the festival.  I first blogged about Peace and Harmony here.
 
 
I've always been a fan of the artwork on the Grateful Dead albums and used that as my inspiration for this quilt. It's kind of tie dye meets pixels in batiks. I think of it as color harmony in a twist
 

This quilt was part of the "Twisting to the 60's with Batiks" blog hop.  I quilted thousands of peace signs with free motion quilting on my domestic machine.  Variegated cotton thread was used for the top and white polyester thread was on the back.  The back fabric was pieced with a peace sign fabric and white on white flowers.
 
Quilt back showing thread


Peace and Harmony with "Love, Peace, and Daisy Hill Forever" Jayhawk

I enjoyed designing and putting this quilt together, mostly because I'm a fan of bright colors.  It is a nice bed sized quilt and was worth every moment of creating.


Quilt Stats
 
Pattern: Peace and Harmony - Here for free
 
Size- 72" x 90"
 
Quilting- Free motion on my Janome 6600
 
Fabric - Batiks


Thank you for visiting my entry, 


Tuesday, October 22, 2013

Velcome


Velcome to my treats for the Vicked Wicked Blog Hop.  My vampire and his little friends are very happy to see you here.
 
Velcome
 
First, let me thank Madame Samm for creating this Halloween party and Vendy Wendy for organizing this event.  Ve have all been so excited to share our vicked little creations.
 

Velcome is an appliqued quilt with a few tricks. I am a true vampire fan and have read all of the Anne Rice Vampire Chronicles as well as others.  I don't know why I like vampires, I just do.   I've named this one Mystat.  He's mine and my favorite vampire is Lestat.  If you are a vampire fan, you know who he is.  Mystat started out as a large drawing on freezer paper and slowly the details came together.
 

His hands and face were hand embroidered before the applique process began.  Mystat is cute and evil at the same time.  How does that happen?

A bald vampire?
A vampire isn't as handsome vithout hair.  I changed his medallion by fussy cutting and appliqueing some Costume Clubhouse Riley Blake fabric.  I felt it looked better, especially with the Velcome letters above.  His face is 3D with extra stuffing added to make it puffy.


After stippling his cape with bumps and stars, I decided to "man him up" a little with some free motion lightning bolts on the background.


Lightening bolt free motion quilting


A vampire needs friends, so I made a few vampire bats rats to keep him company.


Bats seem like the logical friends of a vampire, but having rats on the porch makes people jump a little more and ve like that...
 
 
My hubby made this vonderful stand to put my quilt on.  The Halloween bracket on top can be replaced with Christmas or other holiday decorations. He is a wonder with metal.   It looks like I will be making more quilts of this size to accommodate my new quilt stand.  Vhat a great vay to velcome our guests.

If you aren't villing to leave a little blood, you should go on over to the other stops on this trick or treating excursion.  There are many treats ahead.  Thank you for visiting my little stop.


October 23rd


I do have a treat for you. If you vould like the template for the vampire face, it is free HERE.
 

Have a Happy Halloween,

Talk about driving spell check crazy.  You're Velcome...

Monday, October 21, 2013

Breaking out the Wicked

Halloween will be here soon and we've been getting ready for visitors.


Creepy Lace Spider
A friend had purchased a spider at Pier 1 and it was so cute, I replicated it.  If you would like a spider like this one, glue Styrofoam balls together (one smaller than the other), wrap with lace, and give him 8 pipe cleaner legs.  (I cut 4 in half).  Daddy long legs would require full length pipe cleaners.

A very wicked blog hop starts tomorrow that was created by Madame Samm and organized by Wendy. I will be participating on Wednesday, the 23rd of October, so be sure and come back to see what other wickedness is hiding at my mouse house.  I had a little help with this project and you are going to vant to check it out.

Treats are sure to be found by visiting all of these blogs. 
 
Tuesday, October 22nd

Wednesday, October 23rd

Thursday, October 24th

Friday, October 25th

Monday, October 28th
I Piece 2-Mary
Tuesday, October 29th


Wednesday, October 30th

Thursday, October 31st
 
You vill not vant to be alone...HAHahaha


Friday, October 18, 2013

Where's the Frost for the Pumpkins?

I finished this little wall hanging this morning thinking it would be great to call it "Frost on the Pumpkins." 


 And then it started to snow...


I hate to complain, but I'm a summertime girl.  Spring and fall, I can handle.  What is this?


Here's a closer look at my patchwork pumpkin wall hanging's quilting.

Clockwise from top left:  Pumpkin sections, Pebbles, Scallops, Spiral.  The black background was stippled.

The quilting is free motion on my domestic.  The bottom left is a spiral, but it's not very clear in the picture.  It's probably because my photo session was in a SNOW STORM...yuck.

Those flakes are huge.

This snow is sucking my energy away,


Sharing this post at Crazy Mom  Quilts, The Free Motion Quilting Project, and Whoop, Whoop Friday.

Monday, October 7, 2013

Peace and Harmony Pattern

The pattern is ready. I've posted it on Craftsy and if you would like to have Peace and Harmony in your life, it is free for the taking. The pattern to the quilt, that is. The pattern is HERE.

A quilt cloned


 If the link does not work, give it a few more hours.  I just put it on the website. 
I plan to have Peas and Hominy available soon, also.  (these things take time)..lol
 
It is time to announce a winner from the "Let's Twist to the 60's with Batiks" Blog hop.  Mr. Random chose Julie. 
 
Julie said...
I love your quilt... those bright colors are great !!!!!
October 1, 2013 at 3:40 AM


I just sent you an e-mail Julie.  Congratulations. 
 
This is what Julie won:
 

Everyone is a winner today.
Go get your FREE pattern,


Delete

Sunday, October 6, 2013

Halloween Windowscape - Candy Corn on a String Tutorial

Make over a window with a little Halloween decor. 

Halloween window decorations

In the spirit of the fall season, I transformed my kitchen with a little Halloween decorating. 

Halloween burlap and ruffles window topper curtain.

When I saw this Halloween burlap, I knew exactly what I wanted to do with it.  I was inspired by Madame Samm's French Country Cafe Curtain Tutorial.   With a few changes, I had a window valence.

 
Candy Corn on a string
Candy Corn on a String Tutorial

It's not Halloween without a little candy.  Little stuffed candy corn on a string as you would see peppers hanging by a window seemed perfect.  This recipe makes 7 candy corn.  I doubled it for my stringer.

Here's how to make the candy corn:

 
Cut strips of orange, yellow, and white fabric.  I cut two strips of each color from fat quarters.  (Cut 4 from each color to double the amount of corn.)


Sew the yellow strip to one side of the orange and the white to the other side of the orange strip.  Lay the strips, right sides together, on the cutting mat,  Make sure to line the colors up, matching seams.


Make a template of an equilateral triangle.  From the point to the base should be 4 1/2 inches.  If you have a 60 degree ruler, even better.


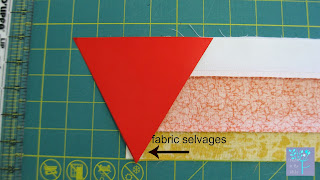
Position the template on one end of the strips and mark the first line.  This will cut off the selvages of the fabric strips.


Use the template to mark the rest of the strip for cutting lines.


Cut on the triangles out, leaving the two layers together.  By doing this, they are ready to sew with the right sides together.


Stitch 1/4" seams around each pair, leaving an opening on the end for turning and stuffing.  After sewing, clip the corners and turn right side out.


It's OK to leave the corners rounded on this project.  Candy corn is a little rounded on the edges.  Stuff the corn, lightly.  If you over stuff, the corn will look too round.  I stuffed each corner first then stuffed the middle.  Slip stitch the opening.

Stuffed Candy Corn on a String

With embroider floss, knot one end and string the corn together by guiding a needle through the top of each one.  Hang it up and enjoy.

Have a "sweet" day,


Sharing over at Freemotion By the River, The Shady Porch, and Sew Darn Crafty.


Fresh Poppy Design