Pages

Wednesday, October 31, 2012

Happy Halloween, Hoohoo Made the Corn?

Finally something done on time...  A Halloween table topper quilt.  I call it "Hoohoo Made the Corn?"


Halloween Quilt

The quilt was completely designed by me, one block at a time. Some of the blocks are pieced, some are appliqued, and some have a little of both. The spider web is free motion stitching and the spider was made with one of the stitches on my Janome MC6600. I had so much fun creating.
 

Appliqued Owl and Pieced Candy Corn
 
The first block I put together for this quilt was the Candy Corn block.  I couldn't wait to use my new 60 degree triangle ruler on something.   Candy corn seemed to be the perfect answer.  I sewed the strips together and used my ruler and a rotary cutter to make the triangle pieces.  The black fabric around the corn was cut in the same matter.  Yep, it says BOO!

Stitched Spider and Web
 
Witch's Hat Pieced and Appliqued
 
The perfect size for my table at 24" x 24".

Appliqued Cat in front of a Pieced Moon
 
I didn't have any Halloween fabric in my stash, so I stopped to buy something for the binding.  That's when I found the candy corn fabric (Trick of Treat by Deb Strain, Moda) for the binding and realized I had the colors for the candy corn all wrong on the first block.....

I've been eating candy corn my whole life and I couldn't get the colors right?  Yellow on bottom, orange in the middle, and a small bit of white on top.  Boy, did I get THAT wrong. I love the quilt anyway.
Puffy goodness on back
I free motion quilted on this one.  I used extra lofty batting to get lots of puffy goodness.


I have been haunted by candy corn since I made this quilt.  Today I had a gift of a candy corn sucker left on my station at work by a friend and a client had this cute napkin to show me this afternoon.  I will never forget the color order of candy corn again.  I promise... hehe.

I hope you have a happy and safe Halloween,


Linking up with:

Sew Darn Crafty 

Blogger's Quilt Festival; Down the Dyeing Path

 
A finish just in time for the Blogger's Quilt Festival.  I also want to express concern and hope that all my east coast friends are doing OK after the crazy storm, Sandy.


Down the Dyeing Path
 
I want to thank Amy over at Amy's Creative Side for hosting the Blogger's Quilt Festival.  I have found some great ideas and wonderful works of art.  I am inspired! 
 
Be sure and take this link and check it out.
Amy's Creative Side


Update....I made the finalist list for the Rainbow Quilt category:  Please vote for me HERE.  Please and thank you :)
*Voting has ended, but you can still see the finalists.*

 
Down the Dyeing Path
 

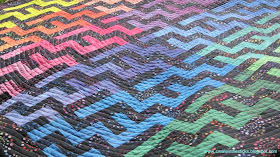
There's a whole lot of firsts for me on this quilt.  The inspiration for the quilt came from a fabric dyeing class at my local quilt shop.   The class was Hands on Hand Dyes and I did the Full Spectrum Playgrounds Kit.  I had never dyed fabric before and loved doing it.  I had a little dye left over after the class and brought it home and did a little more dyeing of my own on some stashed black and white fabric.  The white in the fabric picked up the dye.
Full Spectrum Fabric Dyed by ME :)


A closer look at the black and white dyed fabric by ME :)

The 6 inch blocks are London Stairs. I found the pattern at Quilt-Pro Block of the Day.  They send me a pattern in my email every day.  I used one of the spectrum fabrics in each block.  When I started making blocks I knew I wanted to make a color wheel quilt with every one of the hand dyed fabrics.


Here is the back
I only had a little of the black and white fabric left to put on the back of the quilt.  I wanted to have a little of the original fabric somewhere and thought the back was a great place to incorporate it with some of the extra pieces from the quilt top.


Free Motion Center
The quilting is free motion in the center and then I switched to my dual feed foot and machine (Janome MC 6600) quilted the spiral across the entire quilt to give it a modern twist.


And that is my journey "Down the Dyeing Path".  I'm going to hang this in my Sewing Room for color wheel inspiration.  I use the color wheel at work everyday and am just fascinated by it as a tool for so many things.

Thanks for stopping by and looking.

 
Blogger’s Quilt Festival Stats
Finished quilt measures : 42" x 42″
Special techniques used : hand dyed fabric, free motion quilting
Quilted by : Me :)
Best Category : Favorite ROYGBIV (color wheel) quilt; Home machine quilted quilt; Wall hanging
Entry #:  504


What a cool experience for all of us that don't get to
attend quilt festivals in person, right?


Linked up with:


Sunday, October 14, 2012

Planting Tulips with a Drill

I'm on a mission to add a little color to this place with plants.  So far I've fought the deer and the deer have won.  But today, hubby and I planted 100 tulip bulbs and we did it with a drill and paddle bit. He ran the drill, I dropped the bulbs in the hole, and we were done in no time.   Hopefully we will get to see a little color next spring before the wildlife around here makes lunch out of my flowers.


The bulbs needed to be 6" in the ground, the length of the drill bit.   That makes it so easy to just drill the hole with a 1 1/2" paddle bit.  (or if you don't have that size, hubby can weld one up..lol)

I used the shovel to help guide the bulb into the hole and to cover the bulb back up.  You could hardly tell we had done anything to the lawn.

Drilling the holes

Dropping the bulbs in the holes

Where the tulips will be growing next spring. 
Hopefully there will be an after picture of beautiful tulips growing here next spring.

Add some color to your world,


Linking up with:

Debbie-doos

Underwater, a Bargello Quilt

This little gem was completed last weekend during the cold rainy weather.  There's nothing like a cloudy, rainy day to make me sew and drink coffee all day.

Bargello quilt, "Underwater"

I used a batik jelly roll by "Blank Quilting" and a pattern at Craftsy, My LiL' Bargello by Becky Botello to inspire this 35" x 54" baby quilt.  Because I used 2 1/2 inch strips and added more rows, it's not exactly the same as the pattern.  I call this one, UNDERWATER.  The colors and texture are like a beautiful sea.


I used the extra pieces to make a stripe on the backing.  In fact, I like the back as much as the front because of the great batik fabric I purchased at Prairie Flower Quilt Co.

I've been playing with free motion quilting, but haven't done a full quilt until now.  We'll just call it very whimsical.  Some day I'll look at this first project and say, "you've certainly come a long way!", or maybe I'll still think this is good.  lol

free motion waves

I stitched fish on the outside border and waves all over the rest.

fish and waves stitching

I used a new technique for binding which I love.  A good friend told me it is "old school", but it makes the mitered corners in front and when it's turned, the back corners are already mitered.  Binding is now my favorite thing to do!!!  I'll do a tutorial on this binding technique soon.

Finished with a label
The name is kind of political for me.  I listen to Dave Ramsey on my commute home from work everyday and hear about people who are underwater on their houses and cars.  Quilts record history and I just want to do my part...... ha

I am supposed to be working on mini quilts and quilts for nieces and nephews, but it was nice to finish one for me to hang in the sewing room.

May you be inspired and record a little history,


Linking up with:


Richard and Tanya Quilts

Craftsy BOM - July, August, September, and October

Once again, I'm caught up on the Craftsy Block of the Month class.  This has been a great learning experience for me.  The class is completely free and you can still get in on it.  All of the blocks are illustrated and each one has a video.  The instructor is Amy Gibson.  You can throw a little of your own creativity into the blocks to make them your own.


 July was a study in Dresden:


Craftsy BOM - July

The first Dresden plate was traditional.  Of course I messed it up, but I love the way it turned out.  I was supposed to use the 4 inch template and didn't realize I had used the 4 1/2 inch until I was trying to put the center of the Dresden plate on and it wasn't big enough.  I was going to redo it, but I had used charms from a charm exchange and I loved them.  I don't think the BOM police will get me....

Traditional Dresden Plate Block
 
 
For the modern version of the Dresden, I hand stitched the wheel onto the background.  I hadn't done that for awhile, so it was a challenge nice change of pace.
Modern Dresden Wheel Block
 

August was star month:

Craftsy BOM - August


I'm not a big star fan, but I lived through it.  I struggle through points every time....

Ohio Star Block

I did this one twice.  I hated the colors the first time.  I ripped out the outside points and added the lighter aqua color.  This is much better that the tan star fabric I started with....
 
Double Star Block


September was Drunkard's Path month:

Craftsy BOM - September


The first block was my favorite of this month.  I love working with curves.

Chain Block

The next block was Cleopatra's Puzzle Block.  I thought it was great, until I took a picture of it.  Wow, the bottom is a little wonky.  It's amazing what a picture does for my sewing....ugh.

Cleopatra's Puzzle Block


October is the month of foundation paper piecing...YEAH!

Crafsy BOM - October

The first block was the biggest challenge of the whole year.  I printed the patterns, made sure the scale was right, and went to sewing.  The block was 13" finished.  I went back and measured the templates and found out the scale was for a 12 1/2" FINISHED block, not 12" finished.  UUUGGHH.  I went on the discussion boards and found out that I wasn't the only one frustrated.  I ripped out the four squares and cut them down on the inside so I wouldn't loose my points on the outside.  I still love this block.

Friendship Circle Block

The hardest thing about the last block was that it was the last block.  :^(

Circle of Geese Block
Next month will be the beginning of putting the quilt all together.  I can't wait to finish.  I have learned a lot of cool things about all of the techniquies in the blocks.  Great class!

There are 20 blocks.  You can take a looksy at the others if you want to follow the links below...

Past BOM posts:


I've been busy sewing and not blogging, but I plan to post a few more finished projects real soon,


Linking up with:

The Girl Creative