Pages

Tuesday, March 25, 2014

Flags on a Stick Blog Hop Starts Today

A new blog hop begins today.


Flags on a Stick


This is a garden quilt, Grow,  (made last year for project quilting) that is about ready to come out for spring.
 
I have a new flag to show you
 
(I'll be waving the new flag on my day, April 1st.)
 
Here is the full schedule
to see all the
FLAGS!
 
 
March 25th

Fishkopp

Marjorie's Busy Corner

Jane's Quilting

Seams To Be Sew


March 26th

Living with Purpose

Life In The Scrapatch

Devoted Quilter

Made By Me In Red

Quilting Quietly


March 27th

Bumbleberry Stitches

Quilted Delights

Red Quilts

On the Banks of Frog Creek

Words & Stitches

K and S Sweets and Stitching


March 28th

How arT you?

Just Let Me Quilt

Robin's Fabric Nest

Patchouli Moon Studio

CeLynn's Sunflower Patch


Be a great cheerleader when you visit these blogs.
Comments are the best gift of all.


Sunday, March 23, 2014

Triangle Confetti

This quilt is for the final challenge in Project Quilting.


Season 5

Challenge 6 – the FINAL Challenge of Season 5, Project QUILTING:  Triangles!


The first thing that came to mind when the challenge was announced was wonky log cabin like dancing triangles.


Season 5

Challenge 6 – the FINAL Challenge of Season 5, Project QUILTING:  Triangles!
 
Made by Carla in Dodge City, Kansas
 
 
Size 48" x 54"
Triangle Confetti
 
After making 2 1/2" grey triangles and sewing 2 1/2" strips of bright Kona fabric around, it looked to me like the center had been cut out of the triangle.  That's when "triangle confetti" was inspired.


The large blocks were pieced to be over sized and then cut to be wonky (crooked) 12" squares.


 I made my very first paper piece pattern and used it to make the centers "float" in the bottom squares of the quilt.


This will be a fun donation quilt.

You can vote for your favorite triangle quilt in Project Quilting.
Just click here and click on the hearts of your 4 favorites.

Now I'm going to relax with my son and watch some basketball!
 
Go Shockers!!
oh, and Jayhawks (my son's team)


Saturday, March 15, 2014

Worldwide Quilting Day - Celebrate!

 
How are you celebrating Worldwide Quilting Day?
I will be SEWING!!!
Hopefully all day.
I'm working on a couple Bunny Houses for Easter.
 
Here are a few of the things I've heard going on today for the celebration:
 
http://fatquartershop.blogspot.com/2014/03/happy-quilting-day-giveaway.html?utm_source=feedburner&utm_medium=feed&utm_campaign=Feed%3A+JollyJabber+%28Fat+Quarter+Shop%27s+Jolly+Jabber%29Fat Quarter shop is giving away some gift certificates on it's Jolly Jabber blog site.  Just click HERE.


http://www.craftsy.com/classes/quilting/sale?regType=JOIN_HOME&_ct=wberqbdql-fheceCraftsy is offering some classes up to 50% off.
 
http://createinthesticks.blogspot.com/2014/03/you-can-can-can.htmlMy "Ruffle" giveaway ends tomorrow.  Click HERE to enter.


I will add more as I become aware
Or please leave a comment if you know of other celebrations!
 
Happy Quilting Day, My Friends!


Wednesday, March 12, 2014

Flying Leaf Block Tutorial for 52 Twisted Traditional Block Quilt Along - I'm a guest blogger

Today I am a guest block designer for Kim over at Persimon Dreams
for the 52 Blocks Quilt Along. 


Kim is taking 52 weeks of 2014 to explore the thought of twisting traditional blocks into other images and is having a quilt along for others to join her.


52 Blocks

Today I am presenting my twist on the traditional Maple Leaf block
as the guest designer for block 11 of the quilt along.

 
Kim even did a little mini interview with me and you can read it at Persimon Dreams.

Here is the tutorial to make:
 
 
The Flying Leaf Block
Pattern by Carla at
Creatin' in the Sticks
 
This block is 9 1/2” or Finished it is 9”
Use 1/4” seams throughout.

 
twist on the traditional Maple Leaf block.

 
Step 1:  Cutting
 

From background fabric cut 2 - 4" squares and 2 - 3 1/2" squares.
From bird (feathers) fabric cut 2 - 4" squares and 3 - 3 1/2" squares.
 
You will also need a small scrap of the bird (feather) fabric for the head, a small scrap of black fabric for the eyes, and a small scrap of yellow fabric for the beak.
 
 
Step 2: Half Square Triangles
 
 
We will be using the 4" squares for this.  Put one of each color right sides together.  You have 2 pairs.
Now draw a line from one corner to another on the back side of the lighter fabric as in the picture.


Sew 1/4" seams on each side of the line you drew on both sets of pairs.

 
Cut on the line that you drew and you have 4 sets of half square triangles.

 
Press the seams and then you will have to square your blocks up to 3 1/2".


Lay all 9 squares out like this.  You have a Maple Leaf with out a stem.


Step 3:  Making the bird's head
 
 
Following the manufacturers directions, adhere fusible web to the back of fabric for the head, eyes, and beak.  I use Wonder Under, but any fusible will work for this.  You can use the templates in the PDF version of this pattern, OR...


You can improvise and use the shape of a tablespoon for the head (just lay in on the corner of a piece of paper and trace around it), a hole punch for the eyes, and cut a small triangle for the beak.  I did both and the improvised version looks just like the pattern version. 
 
Which ever method you use to make templates, trace around them on the paper side of the fused fabric and cut them out. 
 
 
Lay the pieces on a 3 1/2" background square using the picture as a guide. Fuse the pieces in place following the manufacturers directions.
 

This is what it will look like.


Now, sew around the head, eyes, and beak. I used a blanket stitch and matching thread.
 
 
Step 4: Sew it all together
 
Stitch the squares together.  I sewed the horizontal rows together first and then sewed the vertical rows.
 
Your block should be 9 1/2" square.
 
If you want to download the templates, this whole tutorial plus the templates are available HERE in PDF format.
 

I had so much fun with the first block I made two of the multi colored birds, then I made a yellow one and added borders to it so I could make an Easter treat bag for someone special.


I used the Flying Leaf Block pattern and added 2" borders all around.  Then I headed over to Glinda Quilts and used her pants bag tutorial to make the drawstring bag.  That's 2 pants bags in one week. The other one was for the Think Ruffles Blog Hop.   I'm starting to think I'm helping Jen with her mission to take over the world with pants bags.  It's a great and easy to follow tutorial.

I can't wait to see all The Flying Leaf Blocks and the other blocks of the 52 Blocks Quilt along.
  Be sure to join the flickr group: 52 Blocks Quilt Along

Thank you, Kim, for allowing me to design a block and thank you to all that have visited my blog!

 
My ruffle giveaway is open until Sunday, March 16th.


Tuesday, March 11, 2014

You Can Can Can

Welcome to Creatin' in the Sticks
 
where
 
 
You Can Can Can.
 
You Can Can Can.  My quilt of can-can dancers.
 
This quilt is for the "Think Ruffles" Blog Hop and welcome to my day in the hop.
The creative mind of Madame Samm at Sew We Quilt came up with this hop to showcase
RUFFLES
and Amy at Sew Incredibly Crazy is doing an incredible job of keeping the hop organized.
 
My inspiration.
 
In case you missed it, I live in Dodge City, Kansas and when I think of ruffles I think of dresses with lots of them.
 
Can-Can Dancers!!


It pays to have artistic friends. 
 I was chatting about what I wanted to make at work one day when the most artistic nail artist happened into the break room.
30 minutes later she handed me a drawing of a Can-Can dancer.
We are offering the template on Craftsy.
 
 
I machine stitched the hair and faces with 2 strands of thread.
Of course every hair do is a different color.
(I'm a hair stylist)  :)
 
 Every time I finished one Can-Can girl, I would tell hubby, "this is my favorite" and then I would make another and that one would be my favorite.
 
This quilt would be very large if I hadn't had a deadline.
I LOVE making ruffles and can-can girls.
*I'm dancing*


The feathers are just a bit of trim that looks like feathers.
I would have used actual feathers, but the dyed variety aren't color fast.
 

Fusible was used for the legs with Moda Basic Grey Little Black Dress floral lace fabric. I used a blanket stitch around the legs.
 

The dresses are yards and yards of ribbon.
Satin and organza ribbon.
Between 5 1/2 - 7 yards per dress depending on the size of the ribbon.
 ( I was shocked when I kept track.)
I was inspired by Madame Samm's method of making ruffles on the machine.
Some of the dresses have organza ruffles inside, but I learned the hard way that it melts.  lol
So the right side of the skirts (the part under the fused leg ) is satin ribbon. Satin ribbon doesn't melt.  *winking big*
The garters are just a wee bit of satin ribbon.


I felt that the quilting needed to be feathers, (a first for me) so I free motioned using my Janome.
The edges were cut in a scallop (another first for me)
and a ruffle added using Moda Basic Grey Little Black Dress 2 Timeless fabric for the
ruffle and the binding. 


The photos were taken at Dodge City's Boothill Museum in front of the Long Branch Saloon where every night of the summer you can see real live Can-Can dancers perform.
Hubby and I try to go at least once a year for dinner, the gun fight, and the variety show.
 
 
Made for Me?  Yes, to hanging in my Dodge City themed guest bed and bath.
 
If you are ever in the area, I recommend a visit to the Boothill Museum.

I made one more Can-Can dancer for Allison, my artist.
Pink hair for this one. *wink*


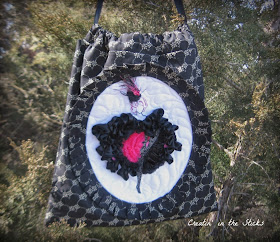
This drawstring bag was made using my friend, Jennifer at Glinda Quilts tutorial for a pants bag.
The same fabrics were used and a ruffle around the oval made it look a bit old fashioned.
It reminds me of those old fabric picture frames.
 
Now get the heck out of Dodge and go see the other beautiful ruffles of the day!


March 11th


 Amy has the complete schedule, just click here.

We're having a heat wave,
A tropical heat wave,
The way that she moves
That thermometer proves
That she certainly can can-can.


Read more: Irving Berlin - Heat Wave Lyrics | MetroLyrics
 
You made it this far.  You deserve a giveaway!
Update:
Giveaway is over.
I didn't have any fabric left from these projects, but my local quilt shop had a couple
Moda Basic Grey Little Black Dress fat quarters to offer.
 
 
I had a couple spools of ribbon.
Just leave a comment and if you follow leave a second comment saying you do.
That's 2 chances to win.
Just make sure I can-can e-mail you if you aren't a Google user.
Giveaway ends Sunday, March 16th.
 
The Winner is:
Maggie!
Blogger maggie said...
Carla, I am just gob-stopped over your can-can quilt. It is so clever, and original. Wow!
I am so glad to read that you are keeping this one. Well done,
cheers
maggie


Monday, March 10, 2014

Hands 2 Help Charity Quilt Challenge

is once again
challenging quilters
in
 

Confessions Of A Fabric Addict

Hands2Help Charity Quilt Challenge.

The details of the challenge are HERE.

Quilters have the chance to win prizes as they make quilts for charity.

That is a win, win!

With 3 different charities to choose from, you will be signing up to make a quilt or quilts for any or all of these three charitable causes.

Last year I made


Natural Charm

to donate to Happy Chemo.


Initial sign ups will be Sunday March 16th through Saturday, March 22nd.

Is there anything better than making a quilt for someone in need?


Make it a point to check out Hands 2 Help!

Let's make 2014 the best year for giving.